

Time for a Mega Crafting post. I never did post this one on my old blog. After my software for my professional vinyl cutter was woefully out-of-date and I would have to purchase new software for quite a lot, I decided to purchase a Silhouette Cameo. I loved that it could do paper, fabric and freezer paper in addition to vinyl. My family had a Disney trip coming up and I decided to make more t-shirts for the kids. I found some great freezer paper tutorials here and here.
First I asked the kids what they would like on their shirts. Lawboy asked for Lego Anakin (the one with sleek hair). I had to use my Photoshop skills to combine two figures into one to get the outline he wanted. Overall he was pleased with the shirt.


 Once I had my outline, I traced it in the Silhouette Design Software. I cut the freezer paper shiny side down on the provided mat. Then I carefully peeled it away and ironed the outline (also shiny side down) onto my shirt. Before you paint, you need either cardboard or plastic between your layers of shirt–otherwise you can end up painting both layers. Next, I painted from the edges into the center. Oh, and also make sure you wash your shirt first. I didn’t and it is evident by the puckering of the material.


My daughter, Princess Ballerina, wanted Cinderella of course. This was a little more detailed. I had to iron on the outline, then place the other elements like hair, dress, face and gloves into the correct spot and iron them down. It took a long time and I didn’t take pictures of the in-between. It took several coats of white paint to get a solid line. I then peeled off the sections. Looking back upon it, I would have done the eyes a little differently.

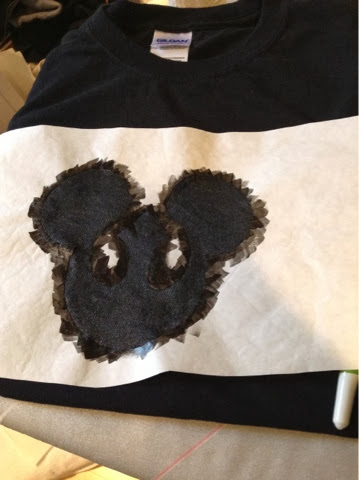
For my husband I made a “Rebel Mickey” head with tone on tone paint. He didn’t want anything too flashy, so this worked well for him. Please excuse the stray paper in the finished product below.


Acroboy wanted a Lego Stormtrooper, looking back on this one, I would have either done this in black or reversed the colors so the white stood out more. Live and learn I guess.
Whirlwind wanted Yoda with a Lightsaber. I masked Yoda and his saber, then sprayed glow-in-the-dark paint all around the outline. After it was all done, I used a neon green, glow-in-the-dark puffy paint for his lightsaber. We’re pretty happy with how it turned out.


Firstborn, who was a teenager, didn’t want anything too childish. We saw a version of his choice on Pinterest. He thought the quote from Tangled was funny so this was his pick.
He wore this while we watched his siblings in the Jedi Academy, and Darth Vader gave him a thumbs up for his shirt. I used both silver and silver glitter paint to paint it. The silver glitter I used more as a base coat, because I didn’t think Firstborn would appreciate being sparkly. It had the right effect.

I also got inspiration for my shirt on Pinterest, only it was a Doctor Who TARDIS swirling through the Time Vortex. I thought the idea would apply as well to Hyperspace, so I found a picture of the Millennium Falcon and created the “Hyperspace bubble” and proceeded to spray with a glow-in-the-dark paint. I also used a brush. You can see the finished product below.


We had a lot of fun wearing our customized Disney shirts in the park, and since I made them all in larger sizes, some of the kids are still wearing their shirts. (The ones who have grown the most have passed them down).
I’d love to know what you think. If I haven’t made any of the instructions clear, feel free to ask in the comments. Happy Crafting!